Tuesday, March 25, 2014

Lets Focus

Achieving sharp focus is an extremely important goal to every astrophotographer. All those "faint fuzzies" you have seen in your telescopes eyepiece can come to life and have depth of field when "seen" through a camera if you have proper framing and sharp focus. Even the best and most expensive telescope and camera combos wont perform to their full potential without the best possible focus. Polar aligning your mount and having good guiding also figure into the equation, but today lets talk about focus.

My first images were done with a DSLR and I used the FWHM (Full Width Half Maximum) feature in BackyardEOS for focusing. This worked well for the most part but it was still difficult on some nights getting the focus just right. FWHM is a numeric interpretation of the size of a star. This number comprises of two measurements; Full Width simply means that the full diameter of the star is used, and Half Maximum is a measure of the distance from the center of the star at which the brightness level decreases to half the level value at the center. FWHM seeks to provide an empirical method of achieving focus but because of changes in the "seeing", it is not always easy to use.

HFD (Half Flux Diameter) is a similar method of focusing. This is a feature included in the program Sequence Generator Pro (SGP). I've been using SGP since I made the switch from the DSLR to the STF-8300M CCD camera. HFD is the pixel diameter of a star in which half the energy of the star is contained. This value is similar to that of FWHM but is considered to be more reliable especially in conditions of poor seeing. Still, it has its flaws and I wanted something more precise.

I had been hearing of people using focusing mask, or Bahtinov mask. These havent been around that long but seem to have made quite a splash in the astrophotography community. In 2008, Pavel Bahtinov, a Russian amateur telescope maker and astronomer, published an ingenious new way to easily focus your DSLR camera, webcam or CCD camera for astrophotography. The method is simple, very intuitive, and the device has universally been named after the inventor: The Bahtinov Mask. They work by producing a distinctive 'diffraction pattern' in a similar manner to the way a four vane secondary mirror spider vane on a Newtonian reflector produces a four pronged star or "spikes". However, the unique design of the Bahtinov Mask produces a bright image with a diffraction pattern forming a long cross comprised of two intersecting lines and a third line that moves across the center of the cross as the telescope is adjusted in and out of focus. Correct focus is achieved when the center line fits exactly in the center of the cross. At a cost of ~$20-$30 I sure didnt have much to lose so I decided to try them.

I decided on the adjustable version from Farpoint Astro. I found what I was looking for at Agena Astro and ordered the FP400 for my 80mm Levenhuk triplet. This mask is adjustable from 2.5" to 4.5". I also placed an order for the FP404 for my 8" Levenhuk RC which is adjustable from 8.5" to 10.5" (outside diameter).

Bahtinov focus mask on 8" RC

   
Adjustable focus mask that I use for my 80mm apo


Example of perfect focus using the Bahtinov focus mask.

I have to say that these things simply just work. They are simple to use, cost very little, and I can now quickly achieve the best focus possible. So if you are having problems getting a sharp focus, grab one (or two) of these. I think they are something every astrophotographer should have in his or her toolbox. Makes me wonder now how I ever got by without one! I feel much more confident now that my images are focused as well as they can possibly be in any seeing conditions. Happy focusing!

Monday, February 17, 2014

New Camera!

I recently bought a few things that were on the wish list in my last post. I now have the SBIG STF-8300M camera, Starlight Xpress 7 position 36mm USB electronic filter wheel, and a new Astrodon 5nm hydrogen alpha filter. After a long wait for the clouds to part I was able to get out and capture a few images with the new equipment.

SBIG STF-8300M and Starlight Xpress 36mm 7 position electronic filter wheel set up with the Astro Physics CCDT67 Telecompressor ready for imaging with the Levenhuk carbon fiber RC telescope.
I decided I would switch from the RC to the Levenhuk 80mm triplet apo for the initial test images. I had to order an 8mm T2 spacer from Agena Astro to get the spacing within half a mm of the recommended 55mm backspacing for the Astro Tech 0.8X reducer/flattener.

The first night out I decided I would target the Seagull nebula (IC 2177). Clouds ended my session earlier than I would have liked but I managed to get in 1 1/2 hrs (9X600sec) on the Seagull and was impressed with what I was able to get with the new equipment. This was also roughly 30 degrees away from a near full Moon.


Compare this to a recent image taken with the same scope on a dark night with my modified Canon DSLR and you will notice a lot more detail from my new CCD with the H-alpha filter.


I had tried imaging the Cone nebula (NGC 2264) before with the DSLR but just could not see anything. I decided I would aim for that a couple night later. This image is 14X600 seconds.


After the Cone moved past meridian, I slewed and refocused the telescope on the Rosette nebula for 14 more shots of 600 seconds.


All of these were shot with the camera sensor set to -15 degrees Celsius. It was very nice to be able to set my temp and then also capture my darks, flats, and bias frames at the same temp. The sensor was kept at a stable temp and varied less than 1/2 a degree. All shots were from -14.8*C to -15.2*C. I captured 24 darks, 30 flats, and 100 bias frames to stack with these images.

There was a problem though. If you will look to the left side of the pictures you might notice a few vertical lines. I was stumped as to why this was but was able to trace it back to my dark frames. I took a set of 12 darks earlier that were fine but my second set of 12 is were the problem came from. The unstretched dark frame appeared to be fine but when I pulled one into Photoshop and did a couple aggressive stretches using levels and curves this is what I found. It fit exactly what I was seeing in my finished images.


The second set of darks were done during the daytime and I thought it could be from light seeping in somewhere. A couple other guys with these cameras however are also reporting these issues so I will just need to keep an eye on things. I will delete this second set of darks and re-take a new set. Hopefully I will then be good to go.

Aside from the issue stated here I am very happy with the new setup and I'm anxious to add the Astrodon LRGB filters as well as the OIII and SII narrowband filters and start getting some color. I will have to be content with what I have for a while longer but I'm excited about the possibilities.

For the full resolution view of these pictures please visit my gallery on Astrobin. http://www.astrobin.com/users/rflinn68/

Thursday, January 2, 2014

Year Ending Images

2013 was a great year for imaging at Little Piney Observatory. We learned a lot, and also had some failures. Most of the failures occurred on the hot Summer nights. Having just started serious imaging in November of 2012, it was our first experience with a hot camera sensor. Let me just say that it was then that I started saving up for a nice CCD camera with cooling capabilities.

Not knowing much at all about CCD astronomy cameras at the time,  I only knew that I wanted one that was capable of keeping the sensor cool. The images with my modified Canon T3 (1100D) seemed to be ok with a sensor temp up to about 27 degrees C. The difference between 27*C and 32*C was enormous.

I have since decided to purchase the SBIG STF-8300M monochrome camera which should greatly improve my images, especially during the Summer months. It is capable of cooling the CCD sensor to -40 degrees C from ambient temp with set point cooling which makes matching dark frames much easier. I hope to have my new camera along with the Starlight Xpress USB powered 7 position 36mm filter wheel by early next month. I plan to start out with an Astrodon 5nm hydrogen alpha filter and gradually fill the filter wheel with Astrodon Tru-Balance E-series LRGB colored filters and the Astrodon 3nm OIII and SII narrowband filters. I am really looking forward to my journey into monochrome CCD imaging.

The forecast for the remainder of the current dark window looks pretty bad so the recent images I was able to get could very well be my final astro images with my DSLR camera. Gary Honis modified my Canon back in March with the Baader UV/IR filter and it has served me well for all but the hot summer nights. I was thankful for the opportunity to get out to the observatory for a few evenings and capture these new images. Most are HII regions, which I'm sure will make me appreciate the new camera and h-alpha filter even more once I have them up and running in the observatory and re-visit these targets.

The Monkey Head nebula (NGC 2174), 33X300 seconds (2.8 hrs)

The Soul nebula (IC 1848), 31X300 seconds (2.6 hrs)

The Rosette nebula (NGC 2246), 36X300 seconds (3 hrs)

The Flaming Star nebula (IC 405), 43X300 seconds (3.6 hrs)


The Tadpoles (IC 410), 47X300 seconds (3.9 hrs)

The Seagull nebula (IC 2177), 23X300 seconds (1.9 hrs)

The Witch Head nebula (IC 2118), 41X300 seconds (3.4 hrs)

I was able to get these from the nights of Dec 27th through Dec 31th. They were all shot with the Levenhuk 80mm triplet using the Astro Tech 0.8X reducer/flattener. The Canon DSLR was set at ISO 800 and Auto White Balance was used on all the HII nebula, Custom White Balance (White Paper) was used on the reflection nebula (Witch Head). Please see my Astrobin gallery for the full resolution pictures. http://www.astrobin.com/users/rflinn68/

It was a good ending to a very good year. I hope 2014 is every bit as rewarding as my first year in this wonderful hobby has been.

Tuesday, December 10, 2013

LLRGB Image processing workflow using Photoshop CS3

This is a very abbreviated version of Scott Rosens LLRGB workflow found on his website, AstronomersDoItInTheDark.com. Its the workflow I'm currently using for almost all of my image processing.

Sunday, December 8, 2013

Alnitak Strikes Again

Many astrophotographers have had a tough time imaging the Horsehead and Flame nebulae around the bright star Alnitak. It is famous for causing reflections and usually reeks havoc on imaging systems. My recent attempt proves I am not immune to this phenomenon.

I actually got hit with a double whammy because I recently installed a dew heater on the secondary mirror of my RC and accidentally left a wire sticking out behind the mirror. This caused some odd artifacts that are mostly noticeable on the brighter stars.

As for Alnitak, it caused some reflections in the upper left and right parts of my image. It appears that the upper left is reflections from my tube baffles. Above and right of the Horsehead is a reflection that is most likely from my Astro Physics CCDT67 Telecompressor. You can clearly see them in this greyscale image.


With a rather large crop of the image I was at least able to salvage something from it.


I hope to be able to revisit this target soon and will move Alnitak outside of the field of view when using the RC. I could probably use my wide field apo and not have this problem but I'd like to get the added detail that isn't possible with the short focal length scope.

I think the problems caused from the dew heater have been fixed so hopefully I'll get some clear nights to do some more testing soon.

Monday, November 4, 2013

A review of the Levenhuk 80mm triplet

I already owned a very good scope for widefield imaging but was looking for something that would be a little more versatile. While I want this to be a review of the Levenhuk 80mm triplet and not a comparison with the Astro Tech AT65EDQ, I need to relate my thinking as to why I thought I needed the new scope.

The Astro Tech scope is a 65mm quadruplet with a built-in field flattener. It provided extremely flat fields all the way to each corner of my images every time I used it. However, there were times I wished it were a faster scope. There were times I wished I had a little wider field of view. And there were times that I wished I could use my 2" diagonal and 2" eyepieces to take in some widefield views. The AT65EDQ would not reach focus with my 2" diagonal in the focuser, and the built-in field flattener prohibited using a reducer/flattener, so I was stuck with its f/6.5 optics that provided a focal length of 420mm. However, it is marketed as an astrograph, and for the last year, it has served me extremely well as just such an instrument.

Enter the Levenhuk 80mm triplet.....

This is the scopes L-shaped mounting bracket bolted to my supplied Losmandy style dovetail.


Upon receiving the scope, the first thing that caught my eye was the paint job. In good lighting this thing is beautiful. It looks to be a pearl white with some metal flakes. I tried to get a close up of the paint but could not get a shot that I felt does it justice.

Comes in a nice little case. The dew shield is extra long compared to other refractors I have used.


The next thing I noticed that I really liked was the threaded metal dust cap. This cap will never fall off and you can take darks in broad daylight and never need to remove the camera from the scope.

The 2" crayford focuser seems to be relatively smooth, but since buying a Moonlite for my newtonian, I can only say that it is adequate. There is a lock for rotating the focuser which is nice for framing a target if you have not already taken flat frames. However, it does not have a screw to lock focus, only a tension screw.

Besides not having a lock screw on the focuser, there were only a couple of things I did not like about the scope. First, it does not come with a mounting bracket for a finder scope. It also does not come with mounting rings. It comes with only the L-bracket that is bolted to the Losmandy style D-plate in the photo. I have since purchased a set of 90mm ID William Optics rings and made a plate to go on top of the rings to mount the finder scope bracket to hold my 50mm Orion mini guidescope. The configuration seems to be very solid.

We all know that getting new astronomy equipment also brings with it lots of clouds, sometimes for days on end. I did manage first light a few days later for a bit of observing with the new telescope. I used my Meade 2" diagonal with the Explore Scientific 24mm 82 degree apparent fov eyepiece for some outstanding widefield views. This provided a field of view of more than 4 degrees with a magnification factor of 20X. The views were extremely crisp and I decided to up the magnification and check collimation with a star test. For this, I installed my Astro Tech 2X barlow in the diagonal coupled with my Explore Scientific ES82 8.8mm eyepiece and slewed to Vega. The diffraction rings showed a perfectly concentric pattern, and when bringing the bright star into focus, I could not see even a hint of chromatic aberration. The premium FPL-53 optics perform flawlessly.

The brief first night of viewing the stars between breaks in the clouds satisfied me for a little while, but I was anxious to see what it would do with my Canon DSLR installed in the focuser. It would be a few nights before the Moon would allow me to do any imaging, so I called Astronomics and ordered their Astro Tech 0.8X reducer/field flattener. This reduced the focal ratio of the scope from f/6 down to f/4.8 and dropped the focal length almost 100mm from 480mm down to 384mm. The Moon allowed only a very short first night of imaging, but this is what I was able to produce in one hour using five minute subs (12X300sec) at ISO 800.

M33, Triangulum galaxy

I want to add some more data to the M33 before posting a full resolution image to Astrobin. Fortunately, I was able to get in some serious imaging a few nights later. This image of Andromeda galaxy is a combination of 53 subs of 300 seconds (4.4 hrs) at ISO 800.

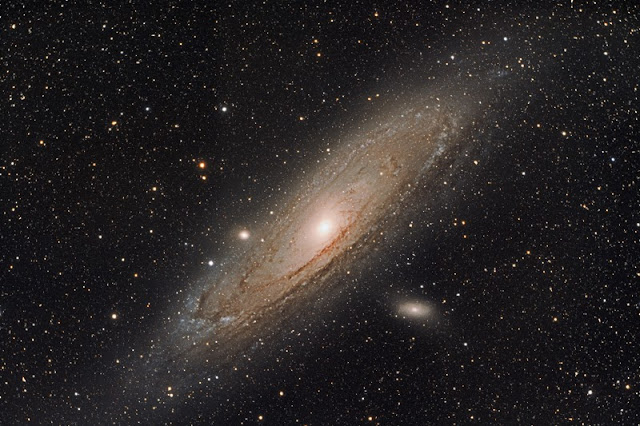
M31, Andromeda galaxy. I was quite pleased with how this one turned out.

The Pleiades (M45) was done over 2 nights and is a total of 100 subs of 300sec (8.3 hrs) at ISO 800.

This image of M45 is my personal record for integration time. I really wanted to pick up the faint dust in this area.

Then I decided to try the Heart nebula, IC 1805. This target is best shot in h-alpha, but I thought I would     
give it a try in RGB with my DSLR. It is 48 subs of 300 seconds (4 hrs) at ISO 800. I probably should have gone with longer subs, but left it at 300 seconds, because I have a good library of dark frames at 300 seconds. Someday I hope to own a nice CCD camera and some narrowband filters. I think it will help greatly on targets such as this one.

IC 1805, the Heart nebula

Full resolution images can be found here in my Astrobin gallery: http://www.astrobin.com/users/rflinn68/  The corner stars look very good on the M45 image, but not so good on the Heart. The camera was never removed, so I suspect this is due to my focusing technique. I probably will need to start focusing on a star somewhere between the center and one of the corners. Everything considered, I am very happy with the new scope.

Here is the scope set up for imaging with the William Optics rings and dew heaters. I made a plate to go on top of the rings for mounting the finder bracket to hold the Orion 50mm mini guidescope.

I ended up selling my AT65EDQ and keeping the Levenhuk 80mm triplet. It is simply a much more versatile telescope and better fits my needs. For starters, it has 15mm more aperture, which is always good. It is a faster scope at its native f/6 and much faster with the reducer at f/4.8 and will give me a couple of focal lengths (384mm and 480mm) to choose from once I purchase a regular field flattener. It is also an excellent grab and go telescope for observing that I can use with my 2" accessories and eyepieces. 

The key word I keep coming back to in regard to this scope is "versatile." I am very pleased with the scope and expect to enjoy it for years to come for both observing and imaging. Great job, Levenhuk, and thank you for such a wonderful instrument!

Saturday, November 2, 2013

The Seven Sisters

I was able to get in another test image with the Levenhuk 80mm triplet. I'm really starting to like this scope and Astro Tech focal reducer/field flattener combo. Not missing the AT65EDQ quite so much now. This image of M45, also known as The Pleiades and The Seven Sisters, was shot over two nights. I was able to stack 100 five minutes subs with this one for a total integration time of 8.3 hours. This is the most data I have put into an image to date. I was really hoping to get the faint dust surrounding the cluster to show up so I spent a good amount of time on it.

The Seven Sisters and the Andromeda galaxy were the first two images Cara and I stacked almost a year ago now. A lot has been learned in the last year and its nice to look back and see improvement made in our imaging and processing techniques.